Wednesday 23 March 2016

SSB from Raspberry Pi

The next thing I want to try is to generate SSB from the Raspberry Pi. To do this I use the "rpitx" program. To get this go to GitHub/F5OEO/rpitx where you will find everything you need and also stuff for SSTV, NBFM modes.

But first I need an audio file, which must be a mono, "wav" format, file and sampled at 48kHz. My Raspberry Pi is called "fido" and my "SSB" directory looks like this:

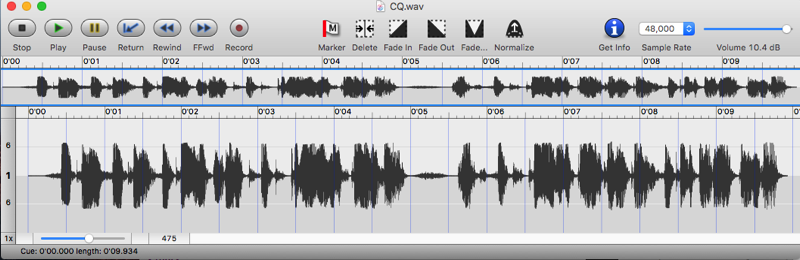
  pi@fido:~/SSB $ ls
  CQIQ.wav  CQ.wav  pissb  rpitx  usage.txt
Here you can see the original "CQ.wav" file. I generated this file on my Mac using the built-in microphone and Soundstudio software. I recorded it, converted it to mono, converted the sample rate to 48kHz, then applied some EQ and compression/normalisation. The result is not marvellous but its OK for testing.

Screen Shot 2016 03 23 at 11 26 43

You can also see in the directory this file after conversion to an "IQ" format file, "CQIQ.wav" - the kind you get from or send to your SDR radio to receive or transmit SSB, this is a stereo file with I = left and Q = right.

Screen Shot 2016 03 23 at 11 29 34

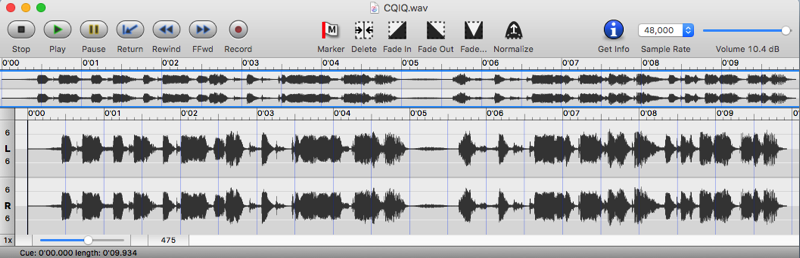
The conversion is made with the program "pissb", it converts to USB today, LSB is not yet an option:
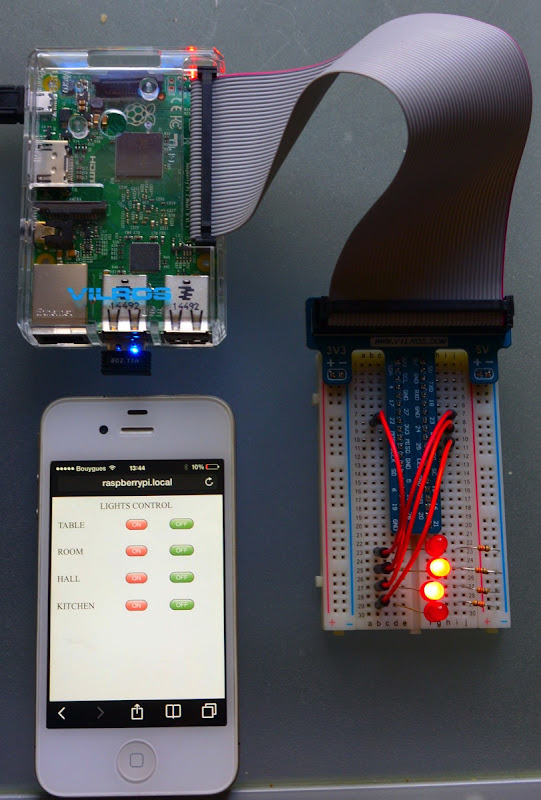
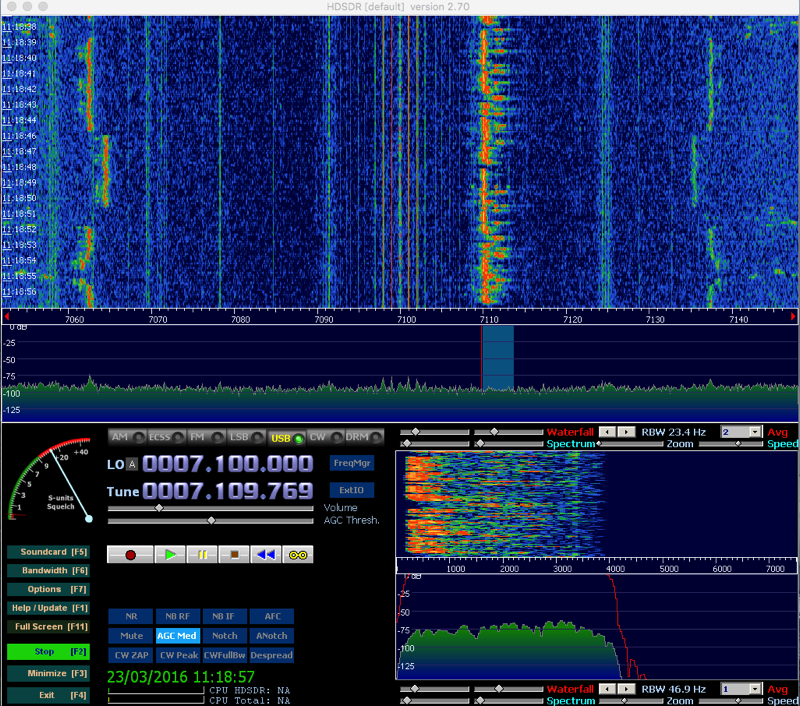
  ./pissb CQ.wav CQIQ.wav
Then to transmit this as SSB, with the output on GPIO18 (pin12) of the R_PI, at 7110kHz:
  sudo ./rpitx -m IQ -i audioIQ.wav -f 7110.0 -l
"sudo", or run as superuser, is needed to access the GPIO pins. The command line is made up like this
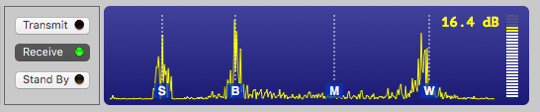
  -m IQ                   - is the mode of transmission, that is IQ
  -i audioIQ.wav          - is the input file name
  -f 7110.0               - is the frequency in kHz
  -l                      - means loop, or repeat the transmission
This is the received signal on my Arduino SDR using the HDSDR software. Frankly it is not very good SSB and the bandwidth is over 3.5kHz, but it is readable.

Screen Shot 2016 03 23 at 11 18 50

The creator of the program is said to be working on improving the SSB generation.

Tuesday 22 March 2016

BBC micro:bit - chose Python coding

P02wfdqd

A million kids in UK are just now receiving their BBC micro:bit computer boards. This is a small but flexible single board micro-computer with a couple of buttons, some sensors and 25 LEDs in a 5x5 matrix. There are also connections for input/output signals and Bluetooth. Code can be written on your PC, then uploaded over USB to the micro:bit board to run.

The BBC is promoting 3 different building-block languages for programming, similar to the well known Scratch language on the Raspberry Pi. And they propose one much more sensible coding language.

I do not believe in these building-block approaches to teach kids to code. At the age of 11-12 kids, who will receive the micro:bit (free), can read and write. So why not teach them to program in one of the most popular written programming languages used today? It is useless to confuse them with "lego" block-type graphics when in real life they will have to write code.

The option that the BBC does offer is the Python language. This is a GREAT solution.

Python sh 600x600

Python is a widely used language today and will give the kids a start in writing real code, and also the possibility to move up to larger machines, like the Raspberry Pi, Linux and Macs which also support Python.

Micro Python

The Python on the BBC web site is an implementation called MicroPython that runs over the internet in your browser. But if you do not want to run it in a browser, which needs an internet connection, you can download and install a stand-alone version on your PC or Mac. I use a Mac so I have downloaded it from

ardublockly-builds.s3-website-us-west-2.amazonaws.com/?prefix=microbit
Other versions are there also for Windows, Linux and Raspberry Pi. The web site CodeWithMu has links to the Windows, Mac OSX and Linux versions, but not the R_PI version, although it says so....

For the R_PI I suggest to get it directly from the site above to your R_PI:
wget https://s3-us-west-2.amazonaws.com/ardublockly-builds/microbit/raspberry_pi/mu
After you get it change the file mode to "a+x" and move it to the /usr/bin directory. You can then add it to the Desktop Main Menu > Programming.

On a Windows PC you have to install extra drivers to upload the machine code from your computer to the BBC micro:bit board, but the Mac does not need any additional stuff installed (Macs are so much better!). Just plug-in your micro:bit to a USB port and you're ready to go.

Screen Shot 2016 03 22 at 12 38 22

Go MicroPython!

So I strongly recommend anyone, whose kids receive the micro:bit board at school, to persuade them and their teachers to go for Python programming. It is well documented and there are plenty of examples at these web sites:
microbit.pythonanywhere.com/help.html
or
microbit-micropython.readthedocs.org/en/latest/
If you follow these sites you will pick up Python in no time.

Screen Shot 2016 03 22 at 12 42 22

Peripherals

If you want some ready-to-go peripherals for your micro:bit - for example to build a robot!!! then go to:
www.kitronik.co.uk/bbc-micro-bit-accessories.html

Screen Shot 2016 03 22 at 12 49 15

Kitronic have a very good motor driver board for a robot's motors, and a light sensor kit for line following. They also have a micro:bit experimenters board for wiring up external circuits.

I wonder what the first Ham Radio apps will be for the micro:bit??? Suggestions???

Monday 21 March 2016

FREQ_PI VFO on Raspberry Pi

Want a VFO that runs from 150kHz up to 250MHz? Great as a test oscillator in the shack. Down load from

https://github.com/JennyList/LanguageSpy/tree/master/RaspberryPi/rf/freq_pi
How to install and use it?
Usage
Install
	mkdir freq_pi
	cd freq_pi
	curl -o freq_pi.c https://raw.githubusercontent.com/JennyList/LanguageSpy/master/RaspberryPi/rf/freq_pi/freq_pi.c
	gcc -Wall -O4 -o freq_pi freq_pi.c -std=gnu99 -lm

Run (in background)
	sudo freq_pi -f (frequency in Hz)
	e.g.
	sudo freq_pi -f 7000000 (VFO at 7MHz)
Stop
	sudo freq_pi -q
The output is on the Raspberry GPIO4, pin7. Do NOT short-circuit this output, or you will damage your R_PI. If you use it the output is a square wave with lots of harmonics, so use a filter, band-pass or low pass.

The site has also a graphic VFO UI written in Python, but I have been unable to get it going - my lack of knowledge of X11 over SSH connections??

Alternative

As an alternative way of generating a VFO signal, the program "rpitx" can be used - download this from GitHub/F5OEO/rpitx. The command is
  sudo ./rpitx -m VFO -f 7100.0
Here the frequency is in kHz. and the mode is selected as VFO.

Wednesday 16 March 2016

MacBook as a server

Wow! I just discovered that my MacBook works just like the Raspberry Pi and can run a Python-based web server. Of course I should have realised that as OSX is based on Unix and very like Linux.

1. Create a valid file "index.html" in a suitable folder(directory), for example using TextEdit, on the "Desktop".

2. Open the Terminal app, at the "$" prompt enter

  $ cd Desktop
  $ ls
   index.html
3. Run the command to start the server
  $ python -m SimpleHTTPServer 8000
    Serving HTTP on 0.0.0.0 port 8000 ...
4. Open a browser on the MacBook or any other computer on your local network and go to the following URL (of course substitute your Mac's name in place of "ganymedebook"...)
  ganymedebook.local:8000

Note: My MacBook is named "GanymedeBook". Look in the Apple Menu > System Preferences > Sharing panel" where you can edit your computer name.

Your browser will display the "index.html" file you created. In my case it was the HTML part of the LIGHT CONTROL page I described earlier for Home Automation:

Screen Shot 2016 03 22 at 11 37 41

A LOT to learn!!!

I have learned a lot: "C" programming (for my Arduino stuff), "Python", "CGI", "UNIX & Shell", "Java", "Javascript", "HTML" and "CSS" - 9 languages for all this computer stuff I have been doing... that's a lot to remember, and I often get confused with the syntax of one with another. Oh for one language, but I guess that won't happen. And now the BBC is going to confuse our kids even more with a couple of Microsoft inventions for its micro:bit board...

Thursday 10 March 2016

WSPR from Raspberry Pi

So after my success with transmitting SSTV from my Raspberry Pi, I thought I would try WSPR. I chose to try the code from JamesP6000. This is the brief usage that I noted to download it and get it going:

  Install
    sudo apt-get update
    sudo apt-get dist-upgrade
    sudo apt-get install git
    git clone https://github.com/JamesP6000/WsprryPi.git
    cd WsprryPi
    make

  Usage
    wspr [options] callsign locator tx_pwr_dBm f1   ...
      OR
    wspr [options] --test-tone f

  Options
    -h --help
      Print out this help screen.
    -p --ppm ppm
      Known PPM correction to 19.2MHz RPi nominal crystal frequency.
    -s --self-calibration
      Call ntp_adjtime() before every transmission to obtain the PPM
      error of the xtal.
    -r --repeat
      Repeatedly, and in order, transmit on all the specified freqs.
    -x --terminate 
      Terminate after n transmissions have been completed.
    -o --offset
      Add a random frequency offset to each transmission:
        +/- 80 Hz for WSPR
        +/- 8 Hz for WSPR-15
    -t --test-tone freq
      Simply output a test tone and the specified frequency. Only used
      for debugging and to verify calibration.
    -n --no-delay
      Transmit immediately, do not wait for a WSPR TX window. Used
      for testing only.

  Example
    sudo ./wspr --repeat M6KWH IO92 10 40m
 
  Frequencies
    Hz
  or.wspr centre frequency for bands:
    LF LF-15 MF MF-15 160m 160m-15 80m 60m 40m 30m 20m 17m 15m 12m 10m 6m 4m 2m

  HDSDR->SoundFlower->WSPR
    40m Centre 7040000, dial 7038600 to get 1500hz tone out
    from 40m = 7040100 tx freq
I made a new directory and put in it:
  -rw-r--r-- 1 pi   pi   1417 Mar 10 14:40 usage.txt
  -rwxr-xr-x 1 pi   pi  69792 Mar 10 14:14 wspr
This is the command I used and the messages in the Terminal
pi@fido:~/WSPR $ sudo ./wspr --repeat M6KWH IO92 10 40m
WSPR packet contents:
  Callsign: M6KWH
  Locator:  IO92
  Power:    10 dBm
Requested TX frequencies:
  7.040100 MHz
Extra options:
  Transmissions will continue forever until stopped with CTRL-C.
Here's the received signal on HDSDR. LOTS OF HARMONICS!!! But the fundamental is readable

Screen Shot 2016 03 10 at 15 51 35
My Arduino SDR audio IQ output is viewed by HDSDR which is then piped to SoundFlower which is then the input to the WSPR program, all running on my iMac.

Screen Shot 2016 03 10 at 15 48 56


As you can see the Pi is set to transmit at 7040100Hz, but the WSPR report reception at 7040027, The problem is almost certainly that my Arduino SDR is off frequency by the difference...

Wednesday 9 March 2016

SSTV transmission by Raspberry Pi

This is not a complete description of the way to get the R_PI to send SSTV images. For a complete set of programs and instructions please go to GitHub/F5OEO/rpitx.

I extracted the files I needed to a new directory "SSTV":

-rwxr-xr-x 1 pi pi   15512 Mar  9 11:09 pisstv
-rwxr-xr-x 1 pi pi  103644 Mar  9 11:09 rpitx
-rw-r--r-- 1 pi pi   15488 Mar  9 11:23 test1.jpg
-rw-r--r-- 1 pi pi 3968512 Mar  9 11:24 test.ft
-rw-r--r-- 1 pi pi  245760 Mar  9 11:24 test.rgb
-rw-r--r-- 1 pi pi     167 Mar  9 12:03 Usage.txt
I have described in a previous post the Arduino based SDR receiver shields that give me reception on 40m. The IQ audio outputs are connected to the iMac with a A/D converter (a Startech device). On the iMac I have running the SDR program HDSDR, a windows program running under Wine.

Screen Shot 2016 03 09 at 13 51 31

The audio output of the HDSDR program is fed to Soundflower, a Mac prograam to route audio from one app to another.

To view the SSTV signals (mine or anyone else's received over the air) the Mac program Multiscan 3B is used. Its audio input is taken from Soundflower so that it is listening to the HDSDR radio.

After installation of the RPITX stuff and installing the programs - see the RPITX web site README - I created a test.jpg file for trial transmissions:

Test

This file is 320x256 pixels and a JPEG (a PNG file can be used). It was converted to RGB using the utility "convert" from imagemagic. This produces an RGB file. Which is then encoded using pisstv to create the FT file for transmission. Finally the transmission is made -m)ode RF, -i)put picture.ft on -f)requency 7171kHz. (I found that either my R_PI output is 100Hz low, or the SDR tunes 100Hz high, but to get a correct SSTV spectrum I had to offset the SDR by 100Hz).The build commands are:
  convert -depth 8 picture.jpg picture.rgb

  ./pisstv picture.rgb picture.ft

  sudo ./rpitx -m RF -i picture.ft -f 7171.0
The received picture was not perfect, but its pretty good for a Raspberry Pi acting as SSTV encode and transmitter, with RF output on GPIO18, fed via a 40m LPF to surpress harmonics.

Screen Shot 2016 03 09 at 13 50 21

Screen Shot 2016 03 09 at 13 45 33

I tried also with a photo of my wife and it came across "real bonny".

Thursday 3 March 2016

HURRAY!!! Home automation in ONE file

I have just discovered that an HTML "form" element can actually "action=..." the file that generates it!

What does this mean?

This means that the same Python executable CGI file can BOTH generate the HTML to display a form on the web browser, AND then receive the "POST" data and take action on it.

This means that my file light_control.py which is an amalgamation of the previous lights_v2.py and control_v2.py of the last post can just by itself give me the result I want!!! HURRAY!!!

I had no idea it would be so simple, its taken me hours of web browsing to find this, everyone doing Home Automation programming should know. We still have the clumsy business of only being able to address the Raspberry Pi's GPIOs as superuser with Python module RPi.GPIO, or use the wiringPi GPIO command line tool to control them, but hey-ho it's a step forward.

DOWNLOAD THE CODE for light_control.py NOW. And run the server_v2.py then go to "raspberrypi.local:8000/light_control.py" to see it working. (you may have to enter your Pi's IP address instead of "raspberrypi.local" above if you have not install the daemon "avahi", or do it now).

So to sum up

1 Make a new directory called "Server" (or whatever you chose) under your "pi/home"

2 Download light_control.py and server_v2.py into this location.

3 IMPORTANT!! Login to your Pi from a Terminal app using "ssh pi@raspberrypi.local

4 Then make both files executable "chmod a+x file_name" - keep forgetting this myself.

5 Run the server "./server_v2.py" which uses port 8000 by default

6 Go to raspberrypi.local:8000/light_control.py in a browser to see the page:

Screen Shot 2016 03 03 at 16 38 16

You can also browse with your iPhone/Android phone to get the page, then add it to your home page!

Upgrade to previous python home automation software

I have studied both HTML and CGI scripts a bit more and refined the code. In particular added more complete HTML, with the proper meta data for mobile phone apps - which now display correctly and can be added to the home screen.

Here is the updated code for lights_v2.py and control_v2.py, the server_v2.py code has no updates.

DSC 2179

Tuesday 1 March 2016

Python based home automation - start of the project

I have been immensely disappointed with the web server installations I made using both apache2 and lighttpd software on the Raspberry Pi. I had an infinite number of "permissions" issues when trying to get CGI scripts to run, I did get a PHP script to run, but never did manage to run any CGI Python scripts.

So I have now tried a very simple server directly built in Python. The trouble here is that the modules used in Python 2, for which I found a few tutorials on the web, are completely different from the modules used in Python 3! And since I cannot get an understanding of the Python 3 versions, I have been obliged to use Python 2. But it works and is only a few lines of code. See server.py code.

Anyone playing with the python code should realise that you can build either an HTTP server for web pages, or a CGI server to respond to CGI pages, but not one server for both. so if you wawnt CGI you have to write your HTMLpages as an executable CGI page, starting "#!/usr/bin/python2"

The second problem I had, and still have, is accessing the Raspberry Pi's GPIO pins without being superuser. The GPIO pins are memory amped and controlled through the /dev/mem device. Obviously it would be dangerous to allow anyone complete control of the memory driver, so it is all owned by "root", thus even any program wishing to use the memory mapped gPIO pins has to be run as superuser.
I installed the RPi.GPIO module, this provides two ways to access GPIO, from within a Python script - which needs the script to be run as superuser - or from the command line as a utility, which does not require superuser! Why? Using RPi.GPIO I made the home automation project I described previously.

I also tried the gpiozero module which seems not to need superuser, but I found that when run in a CGI Python script called by another program running on a server it refuses to access GPIO... no real idea why. Frustrated, I abandoned it.

So I am back to using the command utilities provided by RPi.GPIO, and calling them with a shell executive from my Python program, much as I did previously.

Why do I want the whole project to run in Python? Well I have found a supplier of sockets that are controlled by radio signals, and the same supplier, Energenie, has a small RF Transmitter board that plugs into the Raspberry Pi, and they have a Python module to control it, and through it the sockets. So what I need is a Python program controlled by an HTML web page that sends signals to the Sockets. Like this:

Server.py -running- lights.py (HTML code output) -driving- control.py (GPIO control, eventually to be Energenie control)

Here is the Python code for lights.py and control.py.

The web page display for the lights is very crude today, but is easily beautified using a few styles and a better table layout - tedious programming work, but I will get round to it maybe today...

Screen Shot 2016 02 29 at 16 31 32

The GPIO outputs I have programmed today are 22, 23, 24 & 25. These each drive a 330R + LED. So if you fancy trying to build some simple hoe automation, give it a go.